Minimalist Makeup Routine
Hi friends!
I don't know about you, but mornings are rough for me. Most of my mornings have an early start and I'm not about to wake up extra early just to get ready. So I've created a minimalist natural makeup look that only takes 10-15 minutes of my morning.
STEP ONE:
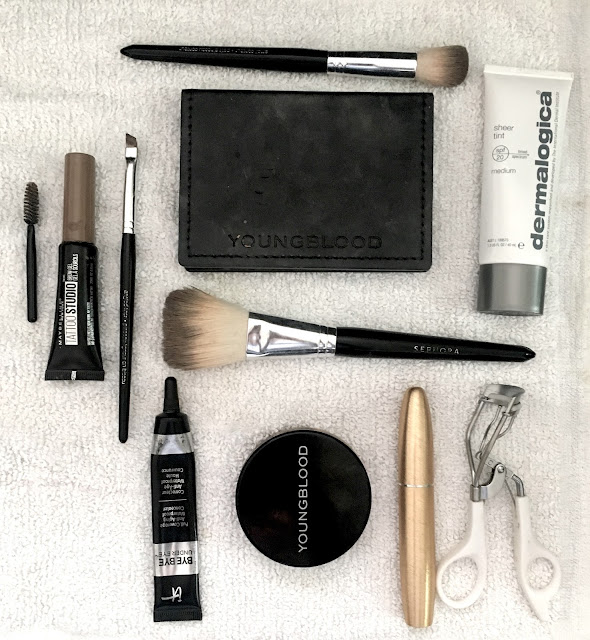
Dermalogica Tinted Moisturizer - shade Medium
I use this product as my first step because it helps even out my skin tone, and protects my skin from the sun with 20 SPF. I use about a fingertips worth of product and apply it with my fingers making sure to distribute it evenly on my face and neck.
STEP TWO:
It Cosmetics Bye Bye Under Eye Concealer - shade Light
This product is the bomb!!! They call it 8 hours of sleep in a tube and it really is! I got this in a shade lighter than my skin tone so it would help to brighten my under eye. I apply a few dots under my eye and use my ring finger in a dabbing motion to blend the product in.
STEP THREE:
Youngblood Natural Loose Powder Mineral Foundation - shade Soft Beige
I have been using this foundation for a while now and I absolutely love it. It has a really beautiful finish which gives your skin just enough of a glow, without looking greasy. I get so many compliments on my skin when I wear this. Most people think it's just my skin because it has such a beautiful natural finish. It has good coverage while still feeling lightweight. I tap a small amount of the product in the lid and use a large fluffy brush to apply this product using a combination of buffing and swiping motions.
STEP FOUR:
Youngblood Contour Palette
With 3 light colors and 3 dark colors, this contour palette is customizable for most skin tones. I use the darkest color to contour my cheek bones, the medium contour color for my eyelid creases, the lightest contour color for my nose, and then whatever is left on the brush to go around the border of my face. I use a small contour brush for all of this and blend, blend, blend using a buffing motion with my brush. Sometimes if I'm looking for just a touch more definition to my eye area, I take a small smudging brush and line my eyes with the darkest color and take an eye shadow brush and use the darkest color again in the outer corner of my eye for a natural smokey eye. I also use the lightest color to highlight the bridge of my nose and the tops of my cheekbones.
STEP FIVE:
Maybeline Tattoo Studio Brow Gel - shade soft brown
When I first got this product, I kind of hated it. It's a liquid gel consistency, and it takes some getting used to. The brush it comes with is super messy. It's supposed to last for 3 days, but apparently my nightly skin care routine is just too good for it to stay on. But once I got over that, and started using an angled eyeliner brush, I kind of started to love it. Since it's made to last, its sweat proof, water proof, and life proof. I love that I don't have to worry about smudging my brows throughout the day. I start by smoothing out my brows with the small spoolie that comes with it. When I apply the product I use my angled eye liner brush to define the top and bottom edges of my brows, avoiding the chunk of brow next to my nose where the brow hair grows vertical. After I've outlined the edges, I go back in and fill out the middle part of my brow. Some days I leave the inner portion of my brows alone, but most days I lightly darken the hairs with whatever remains on the brush after I've filled in the rest of my brows.
STEP SIX:
Grande Cosmetics Mascara
This is probably one of my all time favorite mascaras. It comes in this gorgeous gold tube that looks soooo pretty in my makeup bag and it has a lash boosting formula which helps my lashes grow long. I apply 2 coats of this on my top lashes and leave the bottom lashes alone. I find when I apply mascara on my bottom lashes it just ends up smudging by the end of the day, but if you have smaller eyes, mascara on the bottom lashes helps open up your eyes. Pro-tip: I shake the wand back and forth as I apply the first coat to separate the lashes. On the second coat, I focus on the very tips of my lashes to add length.
OPTIONAL:
Youngblood Illuminate Palette
Some days I just need a little extra sparkle in my life, so I take a glittery highlighter and apply just a little to my cheek bones and my eyelids. I like using the Youngblood Illuminate Palette for this, it has 6 different shades to choose from. My personal favorites are the Pearl for my cheekbones, and the Natural, Bronze, and Gold colors for my eyelids. If I'm getting really fancy, I like to use the Pink or Peach shades as a blush, but that doesn't happen very often. I usually just use my fingers to apply this since it's a creamier consistency.
And that's it! It doesn't take a lot of time and doesn't require a ton of skill. What I really love about this makeup routine is that I only need 6-7 makeup products. Some of the products serve more than one purpose so it's easier to take on the go.
What are your go to makeup products that you can't live without?


Comments
Post a Comment